
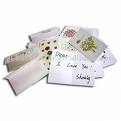
 Greeting cards can almost cost as much as the gift these days, and personally I would rather put the money toward a nicer gift than a card. I know, I know – the wonderful words written in these cards can be very meaningful. So, how do we cut back yet still share meaningful thoughts?
1. Boxed greeting card assortment – I have, over the years, purchased boxes of miscellaneous greeting cards at my local warehouse ( Costco) or Target stores. These have not only saved me money, but have saved me time when I am in a last minute situation needing a card.
 The DIY card making kit. Not only will save us Money but will also simplify our lives when it comes to needing a Birthday card plus you save tons of money.
The Birthday Card Kit Binder – you can also create this to be an all around card making binder or create a 2nd binder to be the Thank You card kit binder.

Thanks to Family Fun you can make your very own Birthday Card Kit.
Turn a humble three-ring binder into a one-stop card-making shop by adding home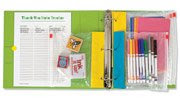

You will need:
- Envelopes, blank note cards, and craft supplies (see suggestions below)
- Plastic Ziploc bags in sandwich, quart, and gallon sizes
- Colored duct tape
- Three-hole or single-hole punch
- Three-ring binder (we used a 3-inch view binder from an office supply store)
- Printable Thank-You Note Tracker or Birthday Calendar
 1 .Determine the quantity and size of bags that will best fit your supplies. We like a smaller size for stamps and labels, while the quart size is perfect for markers. Gallon-size bags may need to be cut down to fit.
2 . For each pocket, sandwich the bag’s bottom edge between two lengths of duct tape, creating one inch of overhang.
3 .Use the binder’s rings to mark the correct positions for holes, then punch the holes through the overhanging tape. Avoid puncturing the bag.
4 . Affix a printable chart inside the front cover with tape or stickers.
 STOCK YOUR BINDER WITH SUPPLIES LIKE THESE:
address book * glitter glue * return address labels * postage stamps * pencils* stamps and ink pad * eraser * sharpener * markers * scissors * hole punch.
Trisha’s Hint: These would be great Holiday Gifts, Baby Shower gifts and Birthday Gifts for your Girlfriends and family members.
Pictures and how to’s From: Family Fun Magazine
One Response
I also save money on cards by buying boxed cards or cards from the Dollar Store. Recently, we’ve been making our own cards using my scrapbook supplies that I don’t use anymore.